Saturday, 27 February 2016

Java Tutorial 5 - Comments

Last Time
Last time we looked at storing the values of calculations in variables and different types of variables.

This Tutorial
We're going to take a break from variables and look at comments

What is a comment?
A comment is some text within the program code which you can see in the code but not in the actual completed program. Only the programmer can see it, not the user.

Why is it useful?
They are used to describe what a part of the code does to make it easier to maintain that code later on

Using Comments
In Java, you can make a comment using 2 forward slashes like so

//This is a comment


That line will be ignored by the computer. Not that it does not need a semi colon

To make a multiline comment you can use a slash followed to an asterisk like so

/*
I
Am
A
Comment
Over
Some
Lines
*/

And end the comment with an asterisk and a slash. That's iot for today, next time we'll look at arrays

Wednesday, 24 February 2016

Java Tutorial 4 - Variables

Last Time
Last time we looked at basic arithmetic with the print command

This Tutorial
In this tutorial we'll be looking at saving values so we can use them later

What is a variable
In a computer program, sometimes we need to save information which we can retrieve later. In Java there are a few different types of variables

int - This is an integer and is a whole number, eg 5
String - This is a collections of characters eg "Hello World"
float - This is a number with a decimal part, eg 5.39
boolean - This is true or false

Using variables
To create a variable in Java, we can use a line like the following

int age = 21;


This creates a variable called age. The variable has a value of 21. The type is int, because it is a whole number.
Now if we wanted to access the value of this variable, we could simply refer to age like so:

System.out.println(age);


Note that there aren't any speech marks around age. That is because we don't want to literally print the word "age" but rather the value of age, which is 21. If you now run the program, you should get output "21" as below
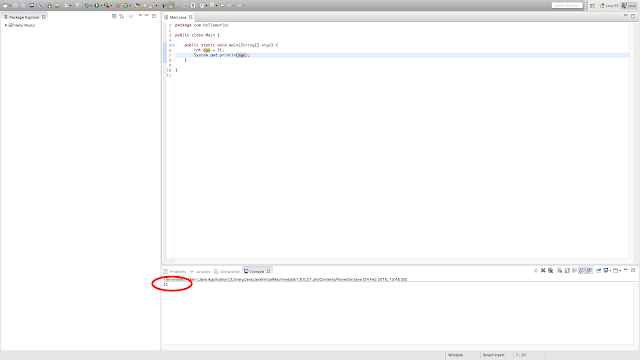


From now on, whenever we refer to age it will know to use the value 21. So if we were to make a new variable, called birthday, and give it the value 2016 - age it should give us our birthday.

int age = 21;
int birthday = 2016 - age;

System.out.println(birthday);

This will print out the value of birthday. The value of birthday is 2016 - the value of age. The value of age is 21. So our result should be 2016 - 21 which is 1995. Sure enough, that's exactly what we get


As you might expect, we can also use - * and / with variables as we can with numbers, as long as the variable is a number (int or float)

Using Strings
A String is a collection of characters or words. We can make a String the same way we make an int except we use the word String at the start rather than int.

String name = "Joe Bloggs";

Notice that you always need speech marks for a String. Also note that Java is case-sensitive and String has a capital S. We could then print this String as usual:

System.out.println(name);

And we should get an output of "Joe Bloggs". We can also add Strings together to join them

String firstName = "Joe ";
String lastName = "Bloggs";
String fullName = firstName + lastName;
System.out.println(fullName);

This assigns the word "Joe " to the variable firstName, the word "Bloggs" to the variable lastName and then adds them together and stores the result in the variable fullName. It then prints fullName which should print "Joe Bloggs".

We will look at floats and boolean in a later tutorial

Sunday, 21 February 2016

Java Tutorial 3 - More Basics

Last Time
Last time we looked at printing "Hello World" and saw that we could change the text to print different words

This Tutorial
In this tutorial we'll look at doing some more interesting things with the print command

Basic arithmetic
Look at this line
System.out.println("Hello World");
We can see that it will print whatever is between the two brackets. Note that we need speech marks, because we want to literally print what we told it. Let's try telling it to print 3+4

System.out.println("3 + 4");


It should literally print out "3 + 4" because we put it in speech marks. However, if we remove the speech marks:

System.out.println(3 + 4);

It should print 7, as it will actually do the calculation rather than taking it literally. Give it a go and see if it works.

Similarly, you can use minus, multiplication and division. See the table below
Add +
Subtract -
Multiply *
Divide /

Try some of these and see what happens. Note that it will also follow the BIDMAS rules, that is it will not calculate based on the order it was typed but rather it will do brackets, then divisions then multiplications then subtractions and finally additions.
So
3 + 4 * 2 = 11 not 14
Because the 4 * 2 is calculated first to get 8, then the 3 is added. We could of course change this by adding brackets
(3 + 4) * 2 = 14

So now we can do some basic maths with the print command, next time we'll look at saving the results we get and using them later in the program!

If you have any questions feel free to leave a comment and I'll try my best to help

Saturday, 20 February 2016

Java Tutorial 2 - Hello World!

Last Time
Last time we looked at setting up Eclipse and installing the JDK

This Tutorial
In this tutorial we'll learn to make a new project and start to code! We'll be making the famous "Hello World" program which, as the name suggests, simply prints out Hello World

Setting up
Open Eclipse if you haven't already, then go to File > New > Other. Search for Java and choose the "Java Project" option as below


Type "Hello World" as the name then click "Finish"


You may be asked to change perspective, click Yes to this


On the left you should now have a Hello World folder. In here you'll have a "src" folder, this is where our code is going to be.

In Java you need to have what's called a "Class" for each bit of code. The program will start at the "main" class so we need to make that now.
Go to File > New > Class


Type "com.helloworld" as the package name (we'll cover what this is later) and "main" as the Class name. Be sure to tick the box as shown in the picture below


The Code
You should now have a few lines of code. The first line is the package name. This needs to be declared at the top of each Class
Next we have the class declaration. Note that the rest of the class is wrapped within curly braces, that's to show it's part of the class.
Similarly, we have what's called the "main" method. A method is block of code which executes when told to. The contents of a method are wrapped in curly braces so the computer knows it's all one method.

Don't worry if you're confused by all the terminology, for now we can just focus on where it says
// TODO Auto-generated method stub
Remove this line and replace it with

System.out.println("Hello World!");

Then run the program by going to Run > Run


Choose "Java Application" and hit OK. You should see "Hello World!" appear at the bottom of the screen like so:


Well done! You've made your first program. As you may expect, if you change the Hello World text in the blue (line 6 in my screenshot) then it will print whatever you replace it with. Have a play around and be sure to come back for more next time!

Friday, 19 February 2016

Java Tutorial 1 - Setting up

This Tutorial
In this tutorial we will download and install the programs we need to do java development. We will be using the Eclipse IDE (Integrated Development Environment).

What you need
Eclipse
Java Development Kit (JDK)

Downloading Eclipse
Eclipse is a software tool which we can use to write, test and run Java code. You can download it from http://www.eclipse.org/downloads/. The one you want is the Eclipse IDE for Java EE Developers.
This will give you a ZIP which you then need to extract onto your desktop. Within the extracted folder will be the eclipse app. Don't open this yet, first we need the JDK!

Downloading the JDK
The latest JDK at the time of writing (February 2016) is version 8. This may be different when you read this. You can download the JDK from Oracle's website. You need to accept the agreement and then download the package suitable for your OS. Follow the instructions to install the JDK.

Setting up Eclipse
Now open up Eclipse from the folder you extracted earlier. You will be presented to choose a workspace location like so
You can choose any location for this, this is where your files will be stored.
Once Eclipse has loaded you will have a Welcome screen. Close this screen (near the top right of the window there will be a welcome tab with an X button). You should now have a main window with a pane on each of the left, right and bottom of the screen.

The Eclipse UI

The pane on the left is the Project Navigator, which should be empty at the moment. This is where your files will be once you have some!
The bottom is your error logs, consoles and other tabs. We will learn what each does in a later tutorial. On the right side you will have "outline" and "task list". You can close one or both of these if you like

That's it for this tutorial, next time we'll start some code!

An introduction to Java programming

What is Java?
Java is a programming language used to make computer programmes. You probably have Java installed on your computer, it is needed to run Java programs. Many popular programs are written in Java, such as Minecraft and the Android Operating System.

What is this tutorial?
This tutorial will cover the basics of Java from complete scratch intended for beginners to programming with little or no experience

What can I do after this tutorial?
This tutorial will allow you to make basic Java programs and set the basis for a future planned tutorial series on making Android apps

Contents
Rest has yet to be decided, be sure to check back regularly for updates!